Category: Software Engineering

  • New Relic Metric Fetcher Plugin for WordPress

    New Relic Metric Fetcher Plugin for WordPress

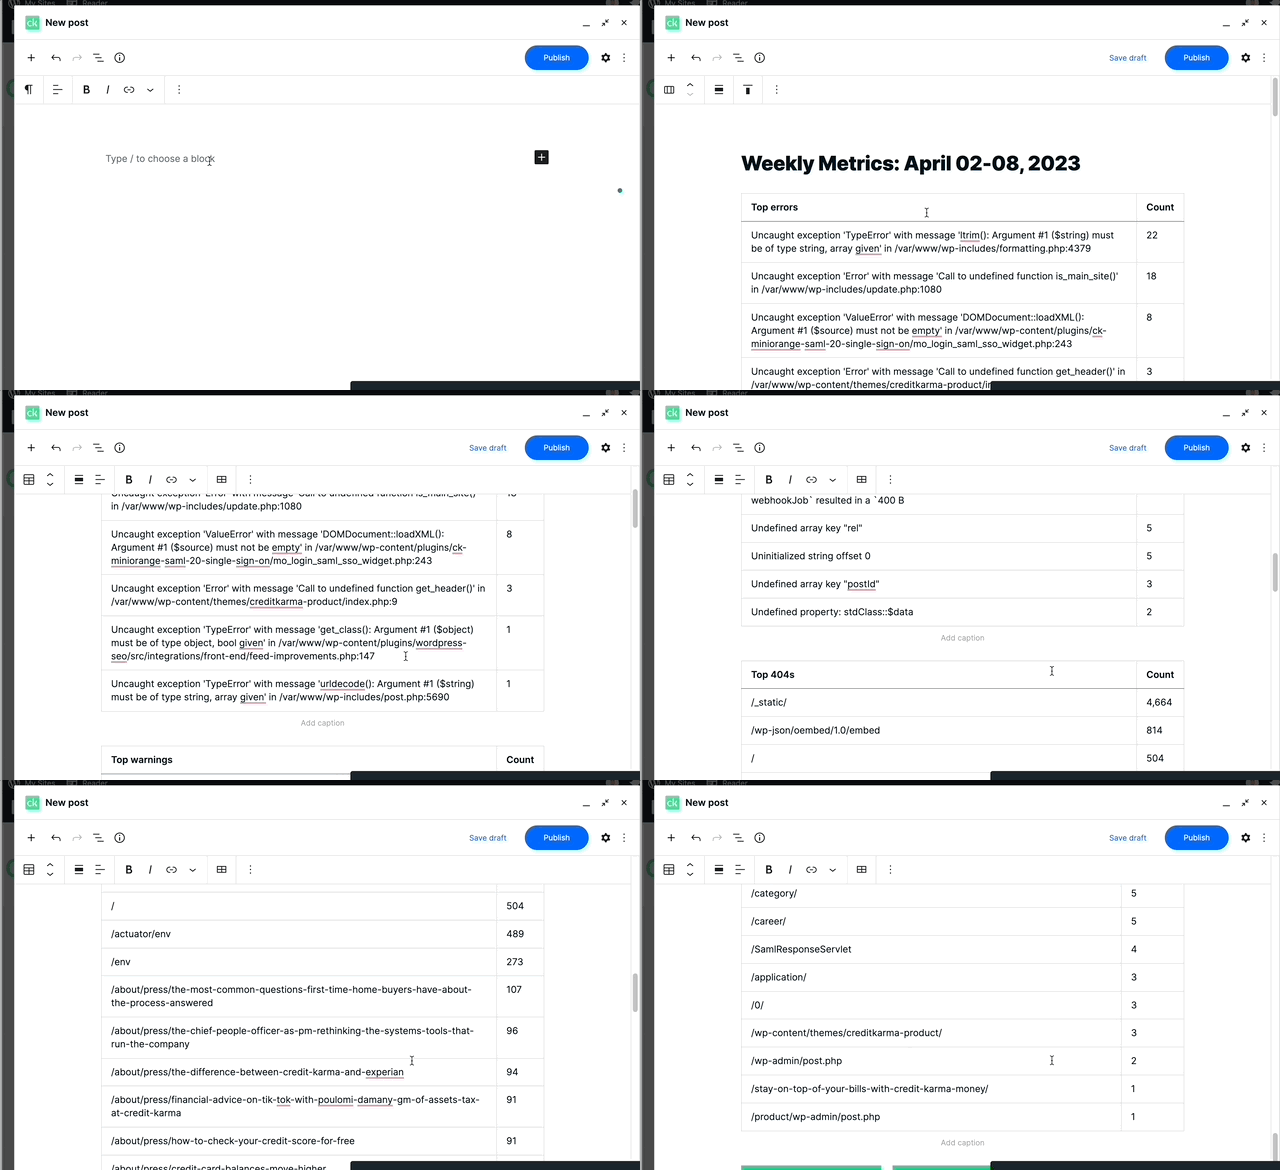
    This script will help to generate a P2-ready post with weekly metrics from New Relic.

    How to use it

    • Download the pre-built plugin from the releases page.
    • Install the plugin on your WordPress site.
    • Add your New Relic API key (NEW_RELIC_API_KEY) to your site’s environment variables. See the WPVIP documentation for more information on managing environment variables.
    • Optionally, you can add your Jetpack (JP_APIKEY). This is required to fetch Jetpack metrics. Uses the following endpoint: https://stats.wordpress.com/csv.php?api_key=1234567&table=views&end=2023-10-07&days=7&blog_id=123456&format=json
    • Go to the settings page and configure the plugin with your New Relic account ID and the site you want to fetch metrics for.
    • Open the Metric Poster page (/wp-admin/admin.php?page=metric-poster), choose your app and click on the “Get Metrics” button.
    • The metrics will be fetched and displayed in the page. You can copy the content and paste it in a P2 post.

    Development

    • PHP 7.4 or higher
    • Composer (version 2.0 or higher)
    # setup steps...
    git clone <this repo>
    cd metric-poster
    composer install

    Deployment method

    To create a release, follow these steps:

    1. Update the version in the composer.json file.
    2. Commit and tag the release (e.g., git tag 1.0.35).
    3. Push the tag to the repository (e.g., git push --tags). This will trigger this project’s GitHub Actions workflow to create a release.

    Once the release is created, you can fetch it to your WP project using composer like this:

    {
        "repositories": [
            {
                "type": "package",
                "package": {
                    "name": "automattic/metrics-poster",
                    "version": "1.0.35",
                    "type": "wordpress-plugin",
                    "dist": {
                        "url": "https://github.com/Automattic/metrics-poster/releases/download/1.0.35/metric-poster-plugin.zip",
                        "type": "zip"
                    }
                }
            }
        ]
    }

    ⚠️ Important: For every new release, update the composer.json file with the new version number and the URL to the new release.

    Plugin file structure

    The plugin file structure should look like this:

    metric-poster-plugin.zip
    ├── metric-poster.php
    ├── vendor
    │   ├── autoload.php
    │   ├── composer
    │   ├── guzzlehttp
    │   ├── ...
    └── gutenberg-templates
        ├── post.tpl.html
        ├── post-no-header-footer.tpl.html
        ├── ... (you may add more templates here)
    ├── src
    │   ├── class-newrelic-gql.php
    │   ├── class-post-generator.php
    │   ├── class-cron.php
    │   ├── class-json-to-table.php
    │   ├── UI
    │   │   ├── class-settings-page.php
    │   │   ├── json-table-converter.php 
    │   │   │   (metric-poster shortcode UI for page 
    │   │   │   https://wp-vip-omar.go-vip.net/json-to-gutenberg-table/)
    ├── .env.example (for local development, rename to .env)
    ├── composer.json
    ├── composer.lock
    ├── README.md
    ├── package.json
    ├── script.php 
    ├── ...
    

    Create a P2 post (Old method)

    ⚠️ Important: The Zapier hook is currently disabled. The script outputs HTML in the terminal, which you need to paste into the Gutenberg editor.

    # php
    # Run the script with the following parameters:
    # --id: The ID of the application
    # --week: The week number for which to fetch metrics
    # --metrics: A comma-separated list of metrics to fetch
    ## Fetches all New Relic metrics with a title heading for P2.
    
    # composer
    
    ## Gets all metrics (NR) with Title heading for P2.
    composer nr-metrics
    
    ## Top errors (NR), no heading.
    composer nr-errors -- --title false
    
    ## Swap out suffix as needed.
    composer nr-404s

    Available metrics

    New Relic Metrics

    • 404s
    • 500s
    • errors
    • warnings
    • cwv
    • mobile cwv
    • JP page views
    • Top slow transactions
    • Top UAs
    • Slow queries
    • Response time
    • Apdex
    • Throughput
  • Chrome extension to modify HTTP headers

    Chrome extension to modify HTTP headers

    Github: https://github.com/Automattic/a8c-chrome-mod-header

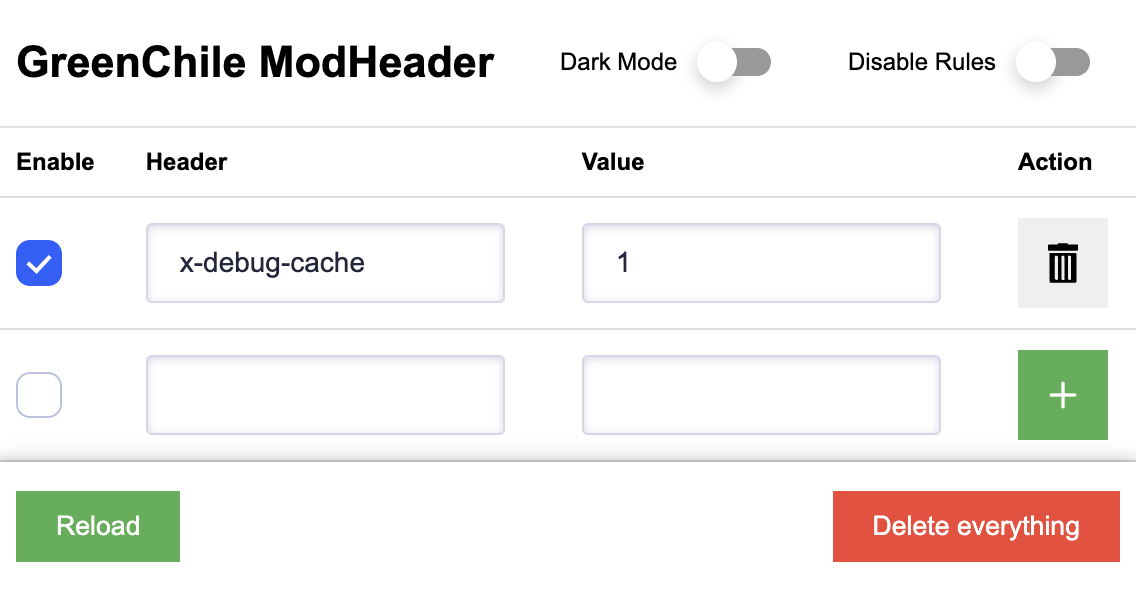
    This is a Chrome extension that allows you to modify request headers for all requests in a page. It can be useful for development, debugging and security testing.

    Features

    • Add, modify or remove request headers.

    Installation

    1. Clone this repository or download the ZIP file.
    2. Open Chrome and go to chrome://extensions/.
    3. Enable “Developer mode” in the top right corner.
    4. Click on “Load unpacked” and select the folder where you cloned or extracted the ZIP file.

    Usage

    1. Click on the extension icon in the toolbar.
    2. Fill in the header name and value.
    3. Click on the “Add” button to add a new header.
    4. Click on the “Reload” button to reload the page with the new headers.
  • How to Set Up a Robust Build System with WordPress/Scripts

    How to Set Up a Robust Build System with WordPress/Scripts

    What is the wordpress/scripts package?

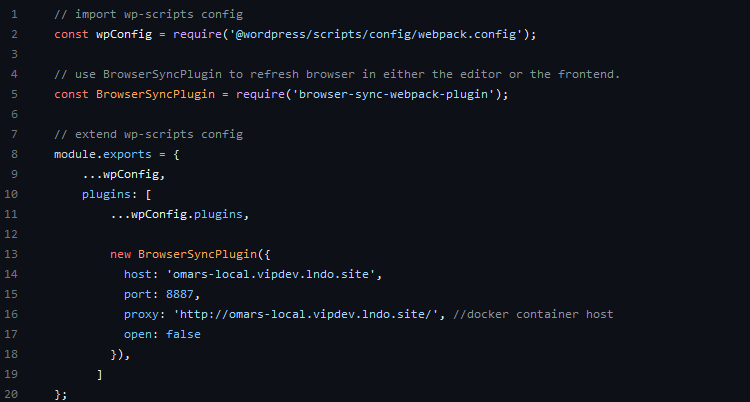
    The wordpress/scripts package is an npm package that provides a robust build system for WordPress applications. It uses webpack.js to compile ES6, React, SCSS, uglify, minify, and can be extended to use other webpack plugins.

    The wordpress/scripts package is not limited to WordPress applications. It can be used to build any web application.

    How to get started

    To get started with the wordpress/scripts package, you need to install it in your project directory. You can do this by running the following command:

    npm install @wordpress/scripts

    Once the package is installed, you can start using it by running the following command:

    npm run build

    This will compile your JavaScript and CSS files and create a production build in the dist directory.

    For more information about extending the default functionality such as entry and output destinations, see the npm link here.

    For WordPress Gutenberg block development

    If you are developing a WordPress Gutenberg block, you can use the wordpress/scripts package to compile your JavaScript and CSS files and create a production build that is compatible with the Gutenberg editor.

    You will then need to add metadata like the following metadata to your block.json file:

    "editorScript": "dist/block.js",
    "editorStyle": "dist/block.css",
    "script": "dist/block.js",
    "viewScript": "dist/block.js"

    The editorScript and editorStyle properties specify the file paths for the JavaScript and CSS files that will be loaded in the Gutenberg editor. The script and viewScript properties specify the file paths for the JavaScript files that will be loaded in the front-end of your website.

    Running your npm scripts anywhere JS is supported

    Once you have created and configured your webpack.js rules, you should be able to fire them off from anywhere nodejs is supported like docker images or CI/CD pipelines.

    To run your npm scripts, you can use the npm run command. For example, to run the build script, you would run the following command:

    npm run build

    Gotchas

    When working with the wordpress/scripts package, it’s important to stay on top of the exciting aspects of managing npm dependencies. This involves staying up to date with updates, security patches, and ensuring a consistent nodejs version. By keeping an eye on these factors, you’ll be able to make the most of your development experience.

    To make sure that your dependencies are up to date, you can run the following command:

    npm update

    To check for security updates, you can run the following command:

    npm audit

    To keep a persistent nodejs version, you can use a tool like nvm.

    Conclusion

    The wordpress/scripts package is a powerful tool that can be used to set up a robust build system compiler for your web applications. It is easy to get started with and can be used to build any web application that uses JavaScript.

    I hope this post has been helpful. Please let me know if you have any questions.

  • Web Components pt. 2: Server Side Rendering thoughts

    Web Components pt. 2: Server Side Rendering thoughts

    The JavaScript ecosystem is constantly evolving, with new frameworks and best practices emerging all the time. One promising area of development is server-side rendering (SSR), which renders web pages on the server before sending them to the client. This can improve Search Engine Optimization (SEO) and page load times, and it can also make it easier to build accessible and performant web applications.

    SSR works by rendering the HTML, CSS, and JavaScript for a web page on the server. This means that the browser does not have to do any of the work of rendering the page, which can significantly improve performance. Additionally, SSR can help with SEO by ensuring that search engines can crawl and index the content of your pages.

    Server-Side Rendering (SSR) is a powerful technique that can be used to significantly improve the performance, SEO, and accessibility of web applications. By pre-rendering the web page on the server and sending the fully rendered HTML to the client, SSR ensures that the initial page load is fast and that the content is accessible to all users, including those with slower internet connections or devices with limited JavaScript capabilities.

    One of the main advantages of SSR is the improved performance it offers. With SSR, the server can do much of the heavy lifting by rendering the HTML and sending it directly to the client. This means that the user doesn’t have to wait for the JavaScript to load and execute before seeing the content, resulting in faster page load times. Additionally, SSR reduces the need for subsequent round trips to the server to fetch additional content, further enhancing the overall user experience.

    SSR Tools

    By using the correct packages with React or other JS technologies, you will be able to render full web pages on the server side. Some of these tools include, but are not limited to:

    • ReactDom.hydrate
    • React rendertostring
    • WP Gutenberg SSR (editor)

    SEO

    Another important benefit of SSR is its positive impact on SEO. Search engines prefer websites with fast load times and accessible content. With SSR, search engine crawlers can easily access and index the pre-rendered HTML, which can lead to better visibility and ranking in search engine results pages. By making your website more SEO-friendly, SSR can help drive organic traffic and increase your online presence.

    Accessibility

    SSR also contributes to improved accessibility. By rendering the HTML on the server and sending it directly to the client, SSR ensures that the content is accessible to all users, including those who rely on assistive technologies like screen readers. This is particularly beneficial for users with disabilities, as it allows them to consume the content without any barriers and fully participate in the online experience.

    Dynamic content and Hybrid approach

    However, it’s important to note that SSR also comes with some challenges. Implementing SSR requires additional server-side infrastructure and expertise, which can increase the complexity of your application. Additionally, SSR may not be suitable for all types of applications, especially those that heavily rely on dynamic content or real-time updates. In such cases, a hybrid approach, combining SSR with Client-Side Rendering (CSR), may be more appropriate.

    Best Practices

    In addition to SSR, there are a number of other best practices that you can follow to improve the performance and SEO of your web applications. These include:

    • Using a lightweight framework or library
    • Minifying and compressing your JavaScript and CSS files
    • Using a content delivery network (CDN)
    • Avoiding third-party scripts
    • Implementing lazy loading

    In summary, SSR is a powerful technique that can greatly enhance the performance, SEO, and accessibility of web applications. By pre-rendering the web pages on the server and sending the fully rendered HTML to the client, SSR improves initial page load times, boosts SEO rankings, and ensures that content is accessible to all users. However, it’s important to carefully consider the challenges and suitability for your specific application before implementing SSR.

  • Web Components in WordPress: A Modernizing Solution with a Lot of Potential

    Web Components in WordPress: A Modernizing Solution with a Lot of Potential

    Web Components are a relatively new technology, but they have the potential to revolutionize the way we develop client-side web applications. Web Components are self-contained, reusable pieces of HTML, CSS, and JavaScript that can be used to create custom UI elements and functionality.

    While Web Components are still not as popular as they should be in WordPress, there is a lot of potential for this technology to modernize client-side development in the CMS. By using a combination of JavaScript tools like webpack.js, @wordpress/wp-scripts, Gutenberg, React, and Native Web Components, developers can create powerful and performant WordPress themes and plugins without having to know a lot of PHP.

    Here are some of the benefits of using Web Components in WordPress:

    Faster performance: Web Components are compiled to native JavaScript, which means that they can be rendered much faster than traditional JavaScript code. This is especially important for WordPress themes and plugins, which need to be able to load and render quickly on all devices.

    Modularity: Web Components are modular, which means that they can be easily reused and shared across different WordPress themes and plugins. This makes it easier to develop and maintain complex WordPress applications.

    Openness: Web Components are an open standard, which means that they can be used by any web developer, regardless of their preferred framework or library. This makes it easier to collaborate on WordPress projects and to create reusable components that can be used in other web applications.

    Example: wp-visualization-blocks plugin

    My plugin, wp-visualization-blocks, demonstrates how to use Web Components to create custom Gutenberg blocks. The plugin uses wp-scripts to compile the Web Components and Gutenberg block code, and it keeps the code separated for modular use of web components onto other applications.

    Conclusion

    Web Components are a powerful new technology that can be used to modernize client-side development in WordPress. By using a combination of JavaScript tools and frameworks, developers can create fast, modular, and reusable WordPress themes and plugins without having to know a lot of PHP.

    I encourage more WordPress developers to explore Web Components and to start using them in their projects. Web Components have the potential to make WordPress development more efficient, scalable, and accessible to a wider range of developers.

    #wordpress #code #gutenberg #reactjs #web-components